Page speed is one aspect of SEO. Google and other search engines and – above all – your blog visitors love fast page loading. As the blog owner, you value your readers’ time, so don’t let them wait more than 10 seconds for any page they want to read in your blog. You may be aware that there are a lot of ways to improve your blog page speed, from using cache plugins (like W3 Total Cache) and optimizing themes, to using a good hosting server (like HostGator) and finally – using a CDN. Yes, WordPress beginners often miss out on the latter. Using a CDN will greatly improve your page speed performance, but generally such services are NOT free.
So what is CDN anyway? Wikipedia defines CDN as:
“A content delivery network or content distribution network (CDN) is a system of computers containing copies of data, placed at various points in a network so as to maximize bandwidth for access to the data from clients throughout the network. A client accesses a copy of the data near to the client, as opposed to all clients accessing the same central server, so as to avoid bottlenecks near that server.” (Source: Wikipedia)
In this article we will be showing you how to use Google App Engine to act as a CDN. Since Google data centers are distributed all over the world, this is a great free service to use with a limit of 1GB/day. What can you host on Google App Engine? The files which are most essential for you to host on Google App Engine are static files, including theme CSS, theme JavaScript files, and theme images. Hosting these static files on Google App Engine will reduce your server load and speed up your page loading time. And that is exactly what will improve your SEO and user experience.
Follow the step-by-step instructions below to start using Google App Engine to host your static files:
1. Create a Google Account. If you have a Gmail account that will do. I won’t explain it in details here, visit here to create one (Skip to Step 2 if you already have a Google Account).
2. Sign up for a Google App Engine Application. Your cell phone might need to be verified again.
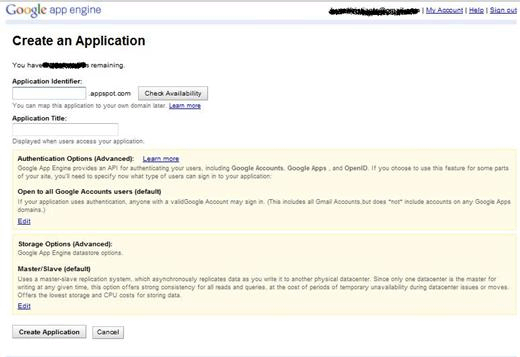
3. Create a Google App Engine Application (in this example I called it myfreecdn).
4. I use Python. Download Python SDK and Google App Engine SDK, and install them both.
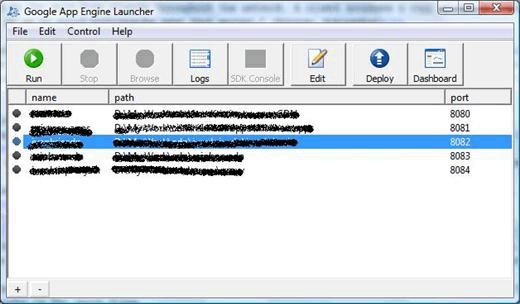
5. Open Google App Engine Launcher and open Preferences from menu Edit » Preferences, then update the Python path to where you install the Python execute file.

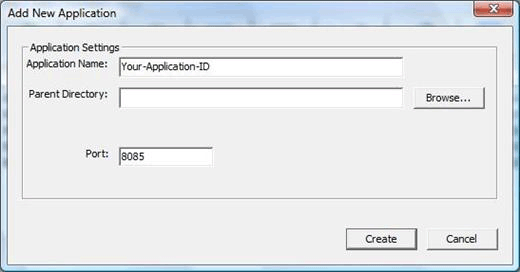
6. Create a new Application by going to File » Create New Application, fill in Application Name (this should be the same as Application identifier so in my case: myfreecdn), then choose where your file will be saved.
7. Now open the folder where you saved the Application, and make two new folders, one called “styles”, and the other called “images”. The Styles folder is where you put your CSS and JavaScript files. Likewise, the Images folder is for image files.
8. Now edit the app.yaml file in the application folder and add the following:
01 |
application: myfreecdn |
02 |
version: 1 |
03 |
runtime: python |
04 |
api_version: 1 |
05 |
default_expiration: "7d" |
06 |
handlers: |
07 |
- url: /images |
08 |
static_dir: images |
09 |
- url: /styles |
10 |
static_dir: styles |
9. Now, copy over all your CSS and JavaScript files to the “style” folder and the image files to the “images” folder.
10. To deploy your Application, just press the button “Deploy” on the toolbar. You would need to enter your Google account account and password. Allow the process to be completed.
11. Now you should be able to access your files by going to this address: http://%5Bapp-id%5D.appspot.com/%5Bimages|styles]. An example location could be: http://myfreecdn.appspot.com/styles/style.css
12. Now go to your WordPress theme, edit all your style URLs to use your Google App Engine URL. And don’t forget to update your style.css relative image URLs to use the Google App Engine URL as well.
13. Upload the updated theme files back into your WordPress blog and test it. (You can use FireBug from Firefox extensions for this purpose.) Now you should be able to feel the difference.
All in all, this is just one way to increase your blog performance. But using this method will have a great impact. I myself use this technique to increase my blog performance. I would like to share with you the benefits of my experience. I hope you find this advice useful.
Editorial Note:
While Ivan shares a great technique here to utilize Google App Engine as a CDN for static files, this is just a shortcut way for making some difference. If you are using it for a very small site, then this might be a good idea. Otherwise there are disadvantages to using this method:
1. You are still serving all blog post images, thumbnails, or any other post attachments without a CDN. So you are not maximizing performance.
2. This method is extremely time consuming if you decide to make changes to your theme because everything is hard coded.
3. There is a limit for free usage 1GB / Day, so if you exceed that you will still have to pay for this service (which is expensive compared to competitor prices). Even if you pay, you would not be able to utilize CDN for the entire site (See point 1) unless ofcourse you want to upload everything on Google App Engine account manually and then manually edit all of your previous post images and thumbnail URLs.
We recommend that you get it right from the start by using MaxCDN. We are using their services to speed up our site. You can pay $39.95 to get 1TB of Bandwidth which is good for one year of use (use the coupon “wpbeginner” to get additional 25% off). This is 635GB additional bandwidth then what Google gives you for the year, and if you pay google $0.12 for each additional bandwidth like their pricing says, then you will end up paying $76.2 for the year (almost twice the price that you would pay for MaxCDN for a year).
Second the best part is that MaxCDN uses Pull Zones which also works with WordPress when using the plugin W3 Total Cache. What this means is that all files will be served through their CDN without you altering a single line of code. Just have the right settings in W3 Total Cache.
